
In this article, we are going to build a shopping cart front for our application. We will be using Vue Vite which has a faster hot module reload. So, let’s dig deep into what is Vue Vite?
Build a Shopping Cart in Vue Vite
Vite word in Vue Vite is actually a French word that means “fast” or “quick”. To know more about Vite in detail, you can check out What the Heck is Vite?
We need to create our application directory for Vue Vite. Create a vue-cart directory in your desktop and run setup Vue Vite by running this command:
cd desktop
mkdir vue-cart && cd vue-cart
npm init vite-app vue-cart
After initializing a Vue Vite application, run this on your terminal:
cd vue-cart
npm install
code . && npm run dev
The code . the command will open up the project in Visual Studio code.
We will continue by setting up our user interface for the application. You can get all our UI components from WrapPixel’s UI Kit. WrapPixel has many admin dashboard templates along with great UI templates and Vue Templates. Now let’s get back to Vue Vite and NodeJs and build a shopping cart.
Let’s create two components: product.vue and chart.vue. The product.Vue will list all our products and cart.vue will list all items in our cart.
We need to configure Bootstrap into our application by adding the CDN to the index.html file.
We will only be interested in the bootstrap CSS CDN, so head over to the official bootstrap CDN copy the CSS link, and add it to the index.html file:
<!DOCTYPE html>
<html lang="en">
<head>
  <meta charset="UTF-8">
  <link rel="icon" href="/favicon.ico" />
  <meta name="viewport" content="width=device-width, initial-scale=1.0">
  <title>Vite app</title>
  <link rel="stylesheet" href="https://stackpath.bootstrapcdn.com/bootstrap/4.5.2/css/bootstrap.min.css"
    integrity="sha384-JcKb8q3iqJ61gNV9KGb8thSsNjpSL0n8PARn9HuZOnIxN0hoP+VmmDGMN5t9UJ0Z" crossorigin="anonymous">
</head>
<body>
  <div id="app"></div>
  <script type="module" src="/src/main.js"></script>
</body>
</html>
With this, we can now set up our component. We will start by creating our root Vuejs file and setting up routing for our application.
Let’s start by installing the Vue 3 router by running:
npm i --save vue-router@v4.0.0-alpha.11After installing this we need to set up the routes for our application. We will have a basic route to show our cart items.
Create a router.js file inside the src directory and add the following codes:
import {
    createWebHistory,
    createRouter
} from "vue-router";
import Home from "./components/HelloWorld.vue";
import Product from './components/product.vue'
import Cart from './components/cart.vue'
const history = createWebHistory();
const routes = [{
    path: "/",
    component: Product
}, {
    path: "/cart",
    component: Cart
}, ];
const router = createRouter({
    history,
    routes
});
export default router;
Here, What we are basically doing is registering our cart and product components as routes.
We have to register our routes in our main.js file:
import {
    createApp
} from 'vue'
import App from './App.vue'
import './index.css'
import router from "./router";

createApp(App).use(router).mount('#app')
With this done, we have to change our App.vue root component to this so that it will render all our components:
<template>
  <nav class="navbar navbar-expand-lg navbar-light bg-info">
    <div class="container">
      <router-link to="/" class="navbar-brand">Vue Cart </router-link>
      <button
        class="navbar-toggler"
        type="button"
        data-toggle="collapse"
        data-target="#navbarNav"
        aria-controls="navbarNav"
        aria-expanded="false"
        aria-label="Toggle navigation"
      >
        <span class="navbar-toggler-icon"></span>
      </button>
      <div class="collapse navbar-collapse justify-content-end" id="navbarNav">
        <ul class="navbar-nav">
          <li class="nav-item active">
            <router-link to="/" class="nav-link">Home </router-link>
          </li>
          <li class="nav-item">
            <router-link to="/cart" class="nav-link">Cart </router-link>
          </li>
        </ul>
      </div>
    </div>
  </nav>
  <router-view />
</template>
<script>
import HelloWorld from "./components/HelloWorld.vue";
export default {
  name: "App",
  components: {
    HelloWorld,
  },
};
</script>
We can now set up our product card and make HTTP requests to our backend API.
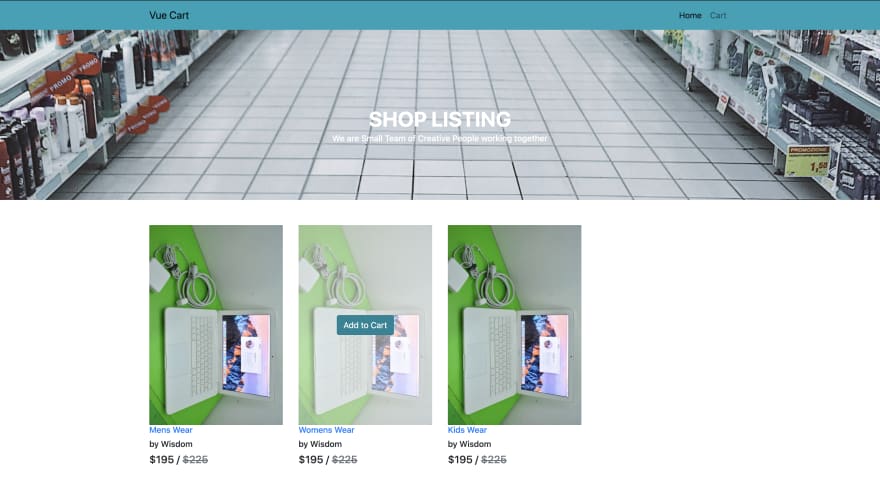
Let’s create a simple user interface for our home page. Add this to the product.vue file:
<template>
  <main>
    <section>
      <div
        class="banner-innerpage"
        style="
          background-image: url(https://images.pexels.com/photos/1005638/pexels-photo-1005638.jpeg?cs=srgb&dl=pexels-oleg-magni-1005638.jpg&fm=jpg);
        "
      >
        <div class="container">
          <!-- Row  -->
          <div class="row justify-content-center">
            <!-- Column -->
            <div
              class="col-md-6 align-self-center text-center"
              data-aos="fade-down"
              data-aos-duration="1200"
            >
              <h1 class="title">Shop listing</h1>
              <h6 class="subtitle op-8">
                We are small team of creative people working together
              </h6>
            </div>
            <!-- Column -->
          </div>
        </div>
      </div>
    </section>
    <section>
      <div class="spacer">
        <div class="container">
          <div class="row mt-5">
            <div class="col-lg-9">
              <div class="row shop-listing">
                <div class="col-lg-6">
                  <div class="card shop-hover border-0">
                    <img
                      src="https://images.pexels.com/photos/1005638/pexels-photo-1005638.jpeg?cs=srgb&dl=pexels-oleg-magni-1005638.jpg&fm=jpg"
                      alt="wrapkit"
                      class="img-fluid"
                    />
                    <div class="card-img-overlay align-items-center">
                      <button class="btn btn-md btn-info">
                        Add to cart
                      </button>
                    </div>
                  </div>
                  <div class="card border-0">
                    <h6><a href="#" class="link">Mens Wear </a></h6>
                    <h6 class="subtitle">by Wisdom</h6>
                    <h5 class="font-medium m-b-30">
                      $195 / <del class="text-muted line-through">$225</del>
                    </h5>
                  </div>
                </div>
              </div>
            </div>
          </div>
        </div>
      </div>
    </section>
  </main>
</template>
<style>
.banner-innerpage {
  padding: 150px 0 100px;
  background-size: cover;
  background-position: center center;
}
.banner-innerpage .title {
  color: #ffffff;
  text-transform: uppercase;
  font-weight: 700;
  font-size: 40px;
  line-height: 40px;
}
.banner-innerpage .subtitle {
  color: #ffffff;
}
.shop-listing .shop-hover {
  position: relative;
}
.shop-listing .shop-hover .card-img-overlay {
  display: none;
  background: rgba(255, 255, 255, 0.5);
  -webkit-box-pack: center;
  -webkit-justify-content: center;
  -ms-flex-pack: center;
  justify-content: center;
}
.shop-listing .shop-hover:hover .card-img-overlay {
  display: -webkit-box;
  display: -webkit-flex;
  display: -ms-flexbox;
  display: flex;
}
.shop-listing .shop-hover .label {
  padding: 5px 10px;
  position: absolute;
  top: 10px;
  right: 10px;
}
/*******************
shop table
*******************/
.shop-table td {
  padding: 30px 0;
}
</style>
This will create a simple user interface for our application. Up next we need to start consuming our endpoints. Start up the backend API that we created in our previous tutorial, after doing that we can now use javascript fetch to make requests to the backend,
Add the following script to the <script> the section in the product component:
<script>
export default {
  data() {
    return {
      products: [],
    };
  },
  created() {
    this.getProducts();
  },
  methods: {
    async getProducts() {
      const res = await fetch("http://localhost:4000/product");
      const data = await res.json();
      this.products = new Proxy(data.data, {});
      console.log(this.products);
    },
  },
};
</script>
This will make a request to our backend API to get the list of all products and store the products in the products array defined in
the data instance.
We can now loop through our products using the Vuejs v-for the directive by modifying the column that holds the product card to this:
     <div
          class="col-lg-4"
          v-for="product in products"
          :key="product._id"
          >
          <div class="card shop-hover border-0">
          <img
          :src="'http://localhost:4000/' + product.image"
          alt="wrapkit"
          class="img-fluid"
          />
            <div class="card-img-overlay align-items-center">
             <button class="btn btn-md btn-info">
                Add to Cart
             </button>
            </div>
          </div>
          <div class="card border-0">
             <h6>
                <a href="#" class="link">{{ product.name }} </a>
             </h6>
             <h6 class="subtitle">by Wisdom</h6>
             <h5 class="font-medium m-b-30">
                $195 / <del class="text-muted line-through">$225</del>
             </h5>
          </div>
     </div>
This will list all the products stored in our database
Now let’s add the add-to-cart feature. We will create a method that will take the product ID and a default quantity as one and then send it to our backend.
Let’s define our addToCart methods:
 async addToCart(id, quantity) {
      try {
        const response = await fetch("http://localhost:4000/cart", {
          method: "POST",
          body: JSON.stringify({
            productId: id,
            quantity: quantity,
          }),
          headers: {
            "Content-type": "application/json; charset=UTF-8",
          },
        });
        let data = await response.json();
        alert("Item added to cart");
        console.log(data);
      } catch (err) {
        alert("Something went wrong");
        console.log(err);
      }
    },
After doing this we have to add the click to our button to trigger the method:
 <button
    class="btn btn-md btn-info"
    @click="addToCart(product._id, 1)"
    >
      Add to Cart
 </button>
Here we pass the productid and the default quantity as 1.
We can now start working on the viewing of cart items, incrementing cart items, and emptying the cart.
Let’s head over to our cart.vue component and build our user interface:
<template>
  <main>
    <section>
      <div
        class="banner-innerpage"
        style="
          background-image: url(https://images.pexels.com/photos/1005638/pexels-photo-1005638.jpeg?cs=srgb&dl=pexels-oleg-magni-1005638.jpg&fm=jpg);
        "
      >
        <div class="container">
          <!-- Row  -->
          <div class="row justify-content-center">
            <!-- Column -->
            <div
              class="col-md-6 align-self-center text-center"
              data-aos="fade-down"
              data-aos-duration="1200"
            >
              <h1 class="title">Cart</h1>
              <h6 class="subtitle op-8">
                We are small team of creative people working together.
              </h6>
            </div>
            <!-- Column -->
          </div>
        </div>
      </div>
    </section>
    <section>
      <div class="spacer">
        <div class="container">
          <div class="row mt-5">
            <div class="col-lg-9">
              <div class="row shop-listing">
                <table class="table shop-table">
                  <tr>
                    <th class="b-0">Image</th>
                    <th class="b-0">Name</th>
                    <th class="b-0">Price</th>
                    <th class="b-0">Quantity</th>
                    <th class="b-0 text-right">Total Price</th>
                  </tr>
                  <tr>
                    <td>
                      <img
                        src="../assets/images/innerpage/shop/1.jpg"
                        width="200"
                        alt="wrapkit"
                      />
                    </td>
                    <td>
                      Mens Wear
                    </td>
                    <td>
                      $3000
                    </td>
                    <td>
                      <button class="btn btn-primary btn-sm">+</button> 3
                      <button class="btn btn-primary btn-sm">
                        -
                      </button>
                    </td>
                    <td class="text-right">
                      <h5 class="font-medium m-b-30">
                        $195
                      </h5>
                    </td>
                  </tr>
                  <tr>
                    <td colspan="4" align="right">Subtotal :$1000</td>
<td colspan="4" align="right">
                      <button class="btn btn-danger">Empty Cart</button>
                    </td>
                  </tr>

                </table>
              </div>
            </div>
          </div>
        </div>
      </div>
    </section>
  </main>
</template>
This will give us this simple user interface:
Let’s implement getting all cart items by creating a method to get all the items from our backend:
<script>
export default {
  data() {
    return {
      carts: {},
    };
  },
  methods: {
    async getCartItems() {
      try {
        const res = await fetch("http://localhost:4000/cart");
        const data = await res.json();
        this.carts = new Proxy(data.data, {});
        console.log(this.carts);
      } catch (err) {
        console.log(err);
      }
    },
  },
  created() {
    this.getCartItems();
  },
};
</script>
We can now loop through our cart items by modifying our table to this:
<table class="table shop-table">
   <tr>
     <th class="b-0">Name</th>
     <th class="b-0">Price</th>
     <th class="b-0">Quantity</th>
     <th class="b-0 text-right">Total Price</th>
   </tr>
   <tr v-for="(item, id) in carts.items" :key="id">
     <td>{{ item.productId.name }}</td>
     <td>{{ item.productId.price }}</td>
     <td>
       <button
         class="btn btn-primary btn-sm"
         @click="increaseQty(item.productId._id)"
       >+</button>
       {{ item.quantity }}
       <button
         class="btn btn-primary btn-sm"
       >-</button>
     </td>
     <td class="text-right">
       <h5 class="font-medium m-b-30">{{ item.total }}</h5>
     </td>
   </tr>
   <tr>
     <td colspan="3" align="right">Subtotal :{{ carts.subTotal }}</td>
     <td colspan="4" align="right">
       <button class="btn btn-danger">Empty Cart</button>
     </td>
   </tr>
 </table>
We can now implement the increment in cart item quantity by adding a method to increment it:
    async increaseQty(id) {
      try {
        const res = await fetch("http://localhost:4000/cart", {
          method: "POST",
          body: JSON.stringify({
            productId: id,
            quantity: 1,
          }),
          headers: {
            "Content-type": "application/json; charset=UTF-8",
          },
        });
        this.getCartItems();
        alert("Item Increamented");
      } catch (err) {
        console.log(err);
      }
    },
Then add a click to listen to this method:
<button
   class="btn btn-primary btn-sm"
   @click="increaseQty(item.productId._id)"
   >+
</button>
Clicking on the + the button will increment the quantity of the items and also update the prices.
Let’s implement the empty cart feature. This will empty our cart and then redirect us to the product listing page. Create a method to do this:
  async emptyCart() {
      try {
        const res = await fetch("http://localhost:4000/cart/empty-cart", {
          method: "DELETE",
        });
        const data = await res.json();
        this.$router.push({
          path: "/",
        });
      } catch (err) {
        console.log(err);
      }
    },
Then we add an event listener to listen to this method:
<button class="btn btn-danger" @click="emptyCart">Empty cart</button>I hope you have read our Build a Shopping Cart in NodeJs earlier.
Exercises
You have learned to build a shopping cart in Vue Vite. Now let’s have some practice by doing some exercises.
- Implement the Decrement feature
- Implement Remove the product from the cart
After implementing this, Push your work to git and add the link in the comment section. Let’s Have Some Fun with Vue Vite and NodeJs.
If you are looking for VueJs Admin Dashboard Template then you can check out below useful Admin Template which can save you time, money, and energy:
Modernize Free Vuetify + Vue js Admin Dashboard


